What Is a Burst Fade — And Why Every Chair in My Shop Requests One
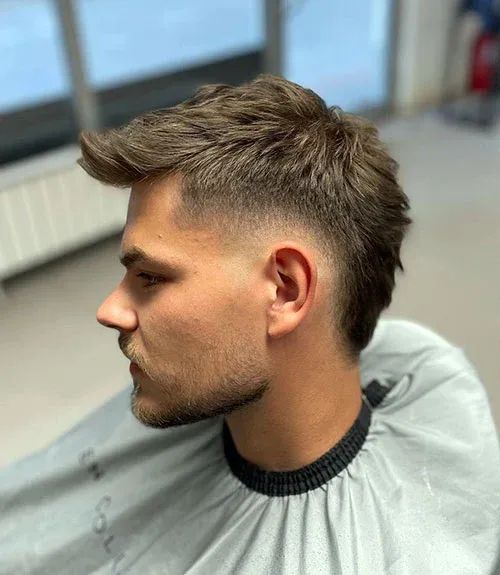
A burst fade is a tapered haircut where the fade radiates outward in a semi-circular arc behind and around the ear, leaving length at the back of the head. Unlike a traditional fade that drops straight down, the burst fade creates a sun-ray or “burst” pattern that curves from the temple area, wraps around the ear, and fans out toward the occipital bone.
Think of it this way: if someone drew a half-circle around your ear using clippers, gradually blending from skin to longer hair as the arc expands — that is a burst fade.
Why is it everywhere right now?
Because it is the foundation of two of the most requested styles in 2026: the burst fade mohawk and the burst fade mullet. These hybrid cuts give clients edge without going fully extreme. The burst fade delivers contrast, movement, and versatility in a way that standard fades simply cannot. It works on straight hair. It works on 4C coils. It works on everything in between.
A note on who wrote this: I am a licensed barber with years behind the chair. Every technique, product recommendation, and piece of advice in this guide comes from hands-on experience cutting burst fades daily — not from recycled internet content. I have shaped this page to help you whether you are a client walking into a barbershop or a barber refining your craft.
The Anatomy of a Burst Fade
To truly understand the burst fade, you need to understand its geometry.
The Semi-Circle Shape
Every burst fade starts with a C-stroke blending technique. The clipper follows a curved path — not a straight horizontal line — that radiates outward from the ear. This creates the signature semi-circular silhouette.
Here is what happens anatomically:
- Starting point: The fade begins at the temple fade transition, right where the sideburn meets the top of the ear
- The arc: The clipper curves behind the ear in a smooth half-moon shape
- End point: The fade fans out as it reaches the occipital bone (the bony ridge at the lower back of the skull), blending into whatever length is left on top and at the nape
The result? From the front, the haircut can look like a standard taper. From the side and back, the burst pattern reveals itself — a dramatic, rounded fade that leaves hair fuller at the nape and crown.
Burst Fade vs. Drop Fade: The Difference That Matters
These two cuts get confused constantly. Here is the clear distinction:
| Feature | Burst Fade | Drop Fade |
|---|---|---|
| Fade direction | Radiates outward in a semi-circle around the ear | Drops down behind the ear in a descending line |
| Nape area | Hair remains longer at the nape | Faded all the way down through the nape |
| Back profile | Open and full at the back | Clean and tapered at the back |
| Best paired with | Mohawks, mullets, longer top styles | Pompadours, slickbacks, crew cuts |
| Overall shape | Rounded, sun-ray silhouette | Curved descending line |
The key takeaway: A drop fade follows gravity. A burst fade fights it — pushing the fade outward and leaving the back untouched. That is why the burst fade is the go-to foundation for styles that need volume and length at the back or center of the head.
The Guideline Points Every Barber Uses
When I cut a burst fade, I work with three guideline zones:
- Zone 1 — The temple: Skin or near-skin. This is the tightest point. Typically a 0 or 0.5 clipper guard
- Zone 2 — Behind the ear: The blending zone. This is where the C-stroke does its work, transitioning through guard 1, 1.5, and 2 depending on how aggressive the fade is
- Zone 3 — The occipital flare: Where the fade “bursts” open and meets the longer hair. This is the artistic zone — how wide and how high you fan this out determines whether the cut reads as subtle or dramatic
Understanding these zones will help you communicate clearly with your barber, or execute cleaner fades if you are behind the chair yourself.
Burst Fade Variations — The Gallery
This is not one haircut. It is a platform that supports dozens of styles. Below are the most requested variations I see in my shop, broken down with honest assessments of who they work for and what maintenance they require.
Low Burst Fade
The fade stays below the top of the ear. The semi-circle arc is tight and compact. The transition from skin to hair is subtle and sits close to the hairline.
Best for:
- Clients wanting a professional, conservative look
- First-timers who want to ease into the style without going aggressive
- Men with shorter hair on top who want contrast without drama
Maintenance level: Low. This version grows out gracefully and can stretch 3 to 4 weeks between cuts.
High Burst Fade
The fade extends well above the ear, with the C-stroke reaching toward the upper parietal ridge. More scalp is exposed, and the contrast between faded sides and the hair on top is aggressive.
Best for:
- Clients who want maximum contrast and a bold statement
- Styles with significant length on top — mohawks, long curly tops, pompadours
- Men with thick, dense hair who need the sides lightened dramatically
Maintenance level: High. This version starts looking grown out within 10 to 14 days. Budget for biweekly appointments.
Burst Fade with Mohawk
This is the number one most requested combination in 2025. The curved fade handles the sides, and the remaining hair on top is styled upward into a mohawk — either a true mohawk with height or a softer faux hawk.
Why does this pairing work so well? The semi-circular shape naturally frames the mohawk strip. Unlike a drop fade or skin fade that cuts into the nape, this style leaves the back untouched — so the mohawk can carry its width all the way from the forehead to the crown without interruption.
Works across hair textures:
- Straight hair (Type 1A–2A): Creates a sharp, punk-inspired silhouette. Needs a strong-hold product to maintain height
- Wavy hair (Type 2B–2C): Adds natural texture to the mohawk. Often the most visually dynamic version
- Curly to coily hair (Type 3A–4C): The curls add volume effortlessly. Minimal product needed. The contrast between coiled texture on top and skin-faded sides is striking
Burst Fade with Mullet
The modern mullet revival owes a massive debt to this cut. Here is why the pairing works:
A traditional mullet has an abrupt transition — short sides, long back. It can look disconnected. The curved fade solves that problem by creating a smooth, blended transition from short sides into the longer back section. The semi-circular shape acts as a bridge between two very different lengths.
Popular variations:
- Short mullet version: 2–3 inches of length at the back. Clean and trendy
- Long mullet version: 5+ inches flowing from the crown. More commitment, more impact
- Textured mullet version: The back is cut with texturing shears for a choppy, lived-in look
Maintenance level: The fade needs regular upkeep every 2 to 3 weeks. The mullet itself is low maintenance — the whole point is letting it grow.
Burst Fade for Curly Hair
Curly hair and this style are a natural match. The texture contrast between tight curls on top and a clean fade on the sides creates one of the most visually impactful cuts in barbering.
Key considerations by curl type:
- Type 3A–3B (Loose to medium curls): The curls fall naturally. A medium version provides balanced contrast without making the top look disproportionately heavy
- Type 3C–4A (Tight curls): More volume on top. A high version works best to balance proportions and prevent the sides from looking bulky
- Type 4B–4C (Coily / kinky): The density of coily hair means the top carries serious visual weight. The fade needs to be crisp and deliberate to create a defined separation. Tapering through the transition zone is critical here — rushing the blend causes patchiness on coily textures
Product note: Curl-defining cream or a light-hold mousse on top. Avoid heavy pomades that weigh down natural curl patterns.
Burst Fade for Straight Hair
Straight hair presents a unique challenge with this cut: every imperfection in the blend is visible. There is no curl or wave to disguise a choppy transition. The barber’s clipper work needs to be surgical.
What works:
- Pairing with a textured crop on top to add movement and dimension
- Using a matte clay or texturizing powder to break up the flat appearance of straight hair
- Keeping the fade on the medium to low side — overly aggressive fades on straight hair can look harsh and unnatural
What to avoid: Going too tight too fast on the transition. Straight hair shows guard lines. Your barber should be using clipper-over-comb and blending shears through the transition zone, not just jumping between guards.
Burst Fade for Coarse / Thick Hair
Thick, coarse hair — whether straight, wavy, or curly — needs special attention during this cut because the hair density resists clean blending.
Barber technique notes:
- Thinning through the parietal ridge is essential. Without it, a bulge of thick hair sits right where the fade is supposed to open up
- Detailing with a T-outliner around the ear arc must be precise. Coarse hair grows back quickly and unevenly
- Expect to need cuts every 2 weeks to maintain the shape. Thick hair regrows faster and loses its defined silhouette sooner than fine or medium hair
Burst Fade with Designs and Lines
Adding hard part lines, geometric patterns, or freestyle designs to this cut is a popular way to personalize the style.
Common design placements:
- Hard part line carved along the temple, separating the top from the faded side
- Curved line following the natural arc of the fade for emphasis and visual flow
- Geometric or tribal patterns etched into the faded area behind the ear — this works best on high versions where there is more exposed scalp to work with
Reality check: Hair designs grow out in 5 to 7 days. If you are not prepared for frequent touch-ups, keep the design simple — a single hard part line is the most sustainable option.
Which Fade Suits Your Face Shape?
Choosing the right variation based on your face shape is the difference between a cut that elevates your features and one that works against them. Here is a practical breakdown.
Round Face
Goal: Create the illusion of length and angles.
Best choice: A high burst fade paired with height on top — think mohawk, pompadour, or textured quiff. The high fade removes bulk from the sides, visually slimming the face. Vertical height on top elongates proportions.
Avoid: Low variations that leave too much fullness at the sides. That extra weight emphasizes roundness rather than counteracting it.
Oval Face
Goal: Maintain balance. An oval face is proportionally versatile, so most styles work.
Best choice: Almost any variation. Oval faces can pull off low, medium, or high versions of this cut. This is the most flexible face shape — experiment freely.
Best bet: A medium burst fade with a textured top. It is universally flattering, low-risk, and requires minimal commitment to maintain.
Square Face
Goal: Soften angular features while maintaining structure.
Best choice: A low to medium version of the cut. The curved, semi-circular shape naturally softens the sharp angles of a square jawline. Pair it with a slightly longer, textured top to add softness without losing masculinity.
Avoid: Very high, very tight fades that sharpen the overall silhouette further. Unless that is the look you want — in which case, own it.
Oblong / Long Face
Goal: Add width and reduce the appearance of vertical length.
Best choice: A low burst fade that keeps some fullness on the sides. Do not strip the sides down to skin — you need lateral volume to create width. Keep the top shorter or textured rather than tall. A mohawk combination with moderate height works better here than a towering one.
Avoid: High fades with tall top styles. Removing side volume and adding height only stretches the face further.
Heart / Diamond Face
Goal: Balance a wider forehead with a narrower chin.
Best choice: A medium version with a side-swept or textured fringe on top. The fringe softens the wide forehead, while the clean faded sides maintain structure without making the chin look even narrower by contrast.
The Barber’s Corner — Technical Talk
Whether you are the client sitting in the chair or a barber sharpening your skills, this section covers the practical, technical side of the burst fade.
What to Tell Your Barber
Walking into a barbershop and saying “give me a burst fade” is a start, but it is not enough. Here is exactly what to communicate:
- “I want a burst fade, not a drop fade.” Say this explicitly. These two get confused constantly
- “I want it low / medium / high.” Specify where the fade starts
- “Keep length at the back” or “Taper the nape.” Clarify what happens at the back of your head. A burst fade naturally leaves the nape longer, but some clients want a nape taper blended in
- Bring a reference photo. This eliminates 90% of miscommunication. Show front, side, and back angles if possible
- Tell them your styling routine. If you use no product and air-dry, that changes how the barber approaches the top. If you blow-dry and use clay, they can leave more length for styling
The Clippers and Tools Behind the Cut
Professional burst fades require precision tools. Here is what your barber should be working with:
Primary clippers (bulk removal and fading):
- Wahl Senior — A workhorse clipper with a powerful motor. Handles thick, coarse hair without snagging. The adjustable blade is ideal for fading
- Andis Master — Known for its precision on all hair textures. The magnetic motor cuts clean lines. Many barbers prefer this for the initial fade outline
- BaBylissPRO FX870 (GoldFX / BlackFX) — A newer favorite. Cordless, high-torque, and the exposed T-blade on the matching trimmer is excellent for the detailing around the burst arc
Trimmers / detailers (outline and ear arc):
- Andis Slimline Pro — Lightweight and precise for carving the C-stroke around the ear
- BaBylissPRO FX787 (Skeleton Trimmer) — Exposed blade for zero-gap detailing. Popular for creating crisp burst fade outlines and hard parts
- Wahl Detailer — A classic. Reliable for edging and fine detail work
Clipper guards used in a burst fade:
| Guard | Length | Role |
|---|---|---|
| No guard (skin) | 0mm | Tightest point near the ear/temple |
| 0.5 guard | 1.5mm | First transition step above skin |
| 1 guard | 3mm | Lower blending zone |
| 1.5 guard | 4.5mm | Mid-blend transition |
| 2 guard | 6mm | Upper blending zone, approaching longer hair |
| 3+ guard | 10mm+ | Used sparingly, only if the burst opens into significant length |
Other essential tools:
- Blending shears (thinning shears) — Critical for softening clipper lines, especially on straight and coarse hair
- Neck duster brush — Seems minor, but clearing cut hair between passes lets the barber see the blend accurately
- Clipper-over-comb technique — Not a tool, but a technique. Your barber should be using a flat-top comb and running the clipper over it in the transition zone for seamless blending. If they are only switching between guards, the blend will have visible lines
Red Flags in the Chair
How to tell if your burst fade is not being cut properly:
- The barber cuts a straight line behind the ear instead of a curve. That is a taper or a drop fade — not a burst
- Visible guard lines in the transition zone. The blending is rushed
- The fade is the same height all the way around. A burst fade should radiate and expand — it is not uniform
- No detailer work around the ear. The arc around the ear is the defining feature. It needs precise trimmer work to look clean
Maintenance and Styling
A burst fade looks its best for roughly 7 to 14 days after cutting, depending on how fast your hair grows and how tight the fade is. Here is how to maximize that window and style the top properly.
How Often to Get a Touch-Up
- Tight/high burst fade: Every 1.5 to 2 weeks
- Medium burst fade: Every 2 to 3 weeks
- Low burst fade: Every 3 to 4 weeks
If budget is a concern, ask your barber about a “fade cleanup” — many shops offer a quicker, cheaper service that resharpens just the fade without touching the top.
At-Home Maintenance Between Cuts
You cannot replicate a full burst fade at home (do not try), but you can extend the life of your cut:
- Neckline cleanup: Use a trimmer to clean up stray hairs at the nape and neck. Follow your existing neckline — do not reshape it
- Edge the sideburns: Keep the line your barber created. Small touch-ups with a detail trimmer every few days keep the cut looking intentional
- Do not touch the fade zone. Seriously. The blended area behind and above the ear is where the artistry is. One wrong pass with a clipper and you will create a visible line that only your barber can fix
- Moisturize your scalp where the fade is shortest. Exposed scalp skin gets dry, flaky, and irritated. Use a lightweight, non-greasy scalp moisturizer or a few drops of jojoba oil
Styling Products for the Top
The burst fade is the frame. The top of your hair is the picture. Choose your product based on your hair type and desired finish:
For thick, textured, or curly hair:
- Matte clay — Medium to strong hold, no shine. Ideal for textured, lived-in looks on mohawks and crops. Apply to towel-dried hair, work it in from back to front
- Curl-defining cream — Light hold, enhances natural curl pattern without crunch. Best for Type 3A–4C hair that you want to look natural
For straight or fine hair:
- Texturizing powder / dust — Adds grip and volume to flat, straight hair. Sprinkle at the roots, work through with fingers. Game-changer for fine-hair mohawks that refuse to stand up
- Light-hold pomade (water-based) — Adds control and a slight sheen. Good for slicked or side-swept tops. Washes out easily
For wavy hair:
- Sea salt spray — Enhances natural wave, adds texture, medium hold. Spray on damp hair, scrunch, air dry
- Matte paste — Similar to clay but slightly more pliable. Good for wavy hair that needs reshaping throughout the day
Products to avoid:
- Heavy oil-based pomades on fine hair — They will weigh it down and make the top look flat, which kills the contrast the burst fade creates
- Gel with a hard cast — It looks dated and creates a helmet effect. If you need strong hold, use clay or a cream pomade instead
Washing and Care Routine
- Shampoo 2 to 3 times per week, not daily. Over-washing strips natural oils from both the longer hair on top and the short-faded areas
- Condition every wash. Even if you have short hair on top, conditioner keeps it manageable and soft
- Blow-dry for volume. If you are styling a mohawk or quiff on top, blow-dry with a round brush directing hair upward and backward. Apply product after blow-drying for maximum hold, or before for a more natural finish
Frequently Asked Questions
These are the real questions I hear from clients weekly, plus high-intent questions people are actively searching.
What is a burst fade?
It is a tapered haircut where the fade radiates in a semi-circular arc around and behind the ear. Unlike standard fades that follow a straight or descending line, this style fans outward — leaving hair at the nape and back of the head longer. The result is a rounded, sunburst-shaped silhouette on the sides.
What is the difference between a burst fade and a taper fade?
A taper gradually shortens hair along a relatively straight, downward line from the crown to the hairline. It follows the natural perimeter of the head. This cut, by contrast, curves outward in a semi-circle around the ear. All variations of this style are technically a form of tapering — but not all tapers use the curved, radiating shape. The direction and geometry are what separate them.
How long does the cut last before it grows out?
A crisp fade looks its sharpest for about 7 to 14 days. After two weeks, most clients notice visible regrowth in the faded areas. How fast it grows out depends on your hair growth rate, texture, and how tight the initial cut was. A skin-tight high version will show regrowth faster than a conservative low variation.
Is this style good for curly hair?
Yes — and it is actually one of the best fade styles for curly and coily textures. The contrast between textured curls on top and clean-faded sides is visually striking. The curved shape of the cut naturally complements the roundness of curly hair. Barbers working on Type 3C to 4C hair should take extra care blending through the transition zone, as coily textures can show uneven patches if rushed.
Can I get this haircut with long hair on top?
Absolutely. This style is specifically designed to pair with length on top or at the back. That is why it serves as the foundation for popular combinations like the mohawk and mullet variations. The faded sides handle the contrast while the top and back retain as much length as you want — from a few inches to shoulder-length in the case of a long mullet.
How much does this haircut cost?
Pricing varies by location, barber experience, and shop tier. In most markets:
- Standard barbershop: $25 to $45
- Mid-range / experienced barber: $40 to $65
- Premium / specialist barber: $60 to $100+
If you are adding designs, hard parts, or razor work, expect an additional $10 to $25 on top of the base price. This cut is more technically demanding than standard fades, so do not choose your barber based on the lowest price. A poorly executed version is worse than no fade at all.
What face shape looks best with this style?
Every face shape can wear it — the key is choosing the right variation:
- Round face → High fade with height on top
- Oval face → Any variation works
- Square face → Low to medium version with textured top
- Oblong face → Low version with side volume
- Heart / Diamond face → Medium version with a fringe
See the full Face Shape Compatibility section above for detailed guidance.
Can I maintain this cut at home?
You can maintain the edges — clean up the neckline, touch up sideburns, and keep the outline around the ears tidy with a detail trimmer. But you cannot maintain the actual fade blend at home without professional training and proper tools. Attempting to blend the transition zones yourself will almost certainly result in uneven patches or visible lines. Invest in regular barber visits.
Where to Go From Here
This guide is your starting point. Every variation, technique, and styling approach mentioned above goes deeper in its own dedicated article. Use the links throughout this page to explore the specific style that interests you.
If you are a client: Bookmark this page. Bring it to your next barber appointment. Use the terminology and reference photos to communicate exactly what you want in the chair.
If you are a barber: Share this resource with clients who are considering this cut. It educates them before they sit down, which means less miscommunication and better results for both of you.
This style is not going anywhere. It has evolved from a niche cut into one of the most versatile foundations in modern barbering. Whether you wear it with a mohawk, a mullet, a textured crop, or simply on its own — the curved fade earns its place as a modern classic.